In-Ground Trampoline Drainage: How to Keep Your Pit Dry and Safe
Installing an in-ground trampoline is a great way to blend fun and aesthetics into your backyard. But many homeowners quickly realize that digging a hole in the ground creates one major challenge: drainage. Without proper planning, your trampoline pit can turn into a muddy, flooded mess. This guide walks you through everything you need to know to ensure your in-ground trampoline stays dry, safe, and functional year-round.
Why Drainage Matters
-
Safety: Standing water can lead to rusted springs, mold growth, and slippery surfaces.
-
Structural Integrity: Saturated soil can erode or collapse around the trampoline frame.
-
Maintenance: Poor drainage means frequent cleaning and potential long-term damage.
Step-by-Step: How to Handle In-Ground Trampoline Drainage
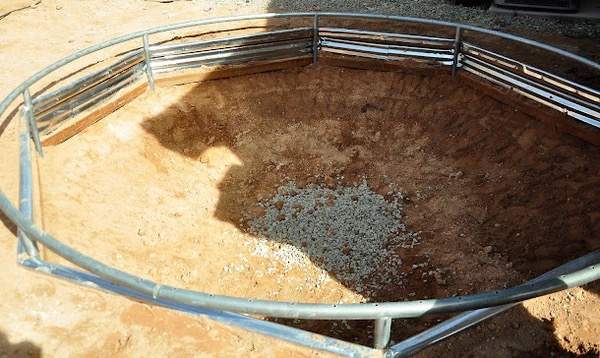
1. Design the Pit with Drainage in Mind
Dig the hole slightly deeper than the trampoline frame to allow room for gravel or a drainage system. The pit should also slope gently to one side to encourage water flow toward your drainage solution.
2. Add a Gravel Drainage Base
At the bottom of the pit, add 4 to 6 inches of crushed gravel. This allows water to filter through instead of pooling directly under the trampoline and provides a stable foundation.
3. Choose the Right Drainage System
Depending on your yard’s conditions, you’ll need one of these common solutions:
Option A: French Drain
-
What it is: A trench filled with gravel and a perforated pipe.
-
How it works: Redirects water away from the trampoline pit to a safe runoff area.
-
Best for: Slightly sloped yards or moderate drainage issues.
Option B: Sump Pump System
-
What it is: A pump installed in a basin at the lowest point of the trampoline pit.
-
How it works: Automatically pumps out water during rain.
-
Best for: Flat yards, heavy clay soil, or frequent flooding.
Option C: Dry Well (Soakaway Pit)
-
What it is: A buried container or gravel-filled pit that holds water and slowly disperses it.
-
How it works: Collects water and lets it gradually seep into the soil.
-
Best for: Yards with decent drainage and moderate rainfall.
4. Improve Drainage Around the Trampoline
Make sure the surrounding ground is graded so that water flows away from the trampoline area. You can also use swales, berms, or garden drains to keep surface water from entering the pit.
5. Ongoing Maintenance
-
Clear leaves and debris from gravel and drainage pipes.
-
Check for standing water after storms.
-
Test sump pumps every season to ensure they still function.
Bonus Tip: Use a Weather-Resistant Cover
When not in use, cover your trampoline to prevent rain from collecting in the pit. This simple step can significantly reduce water issues.
FAQs
Q: Can I just use gravel without any other drainage system?
A: Gravel helps with minor water control, but without a way to move water out of the pit, you’re still at risk for flooding.
Q: How do I know if I need a sump pump?
A: If your yard retains water after rain or your pit stays wet for more than 24 hours, a sump pump is a smart investment.
Q: Can I add drainage to an existing trampoline setup?
A: Yes, you can retrofit a French drain or sump pump into most existing pits without redoing the entire area.
Conclusion
In-ground trampolines are a sleek backyard upgrade—but without proper drainage, they can cause more headaches than joy. By planning your pit design carefully and using the right drainage method for your yard, you can ensure your trampoline stays safe, dry, and low-maintenance all year long.