admin
Everything You Need to Know About Rebounder Trampolines
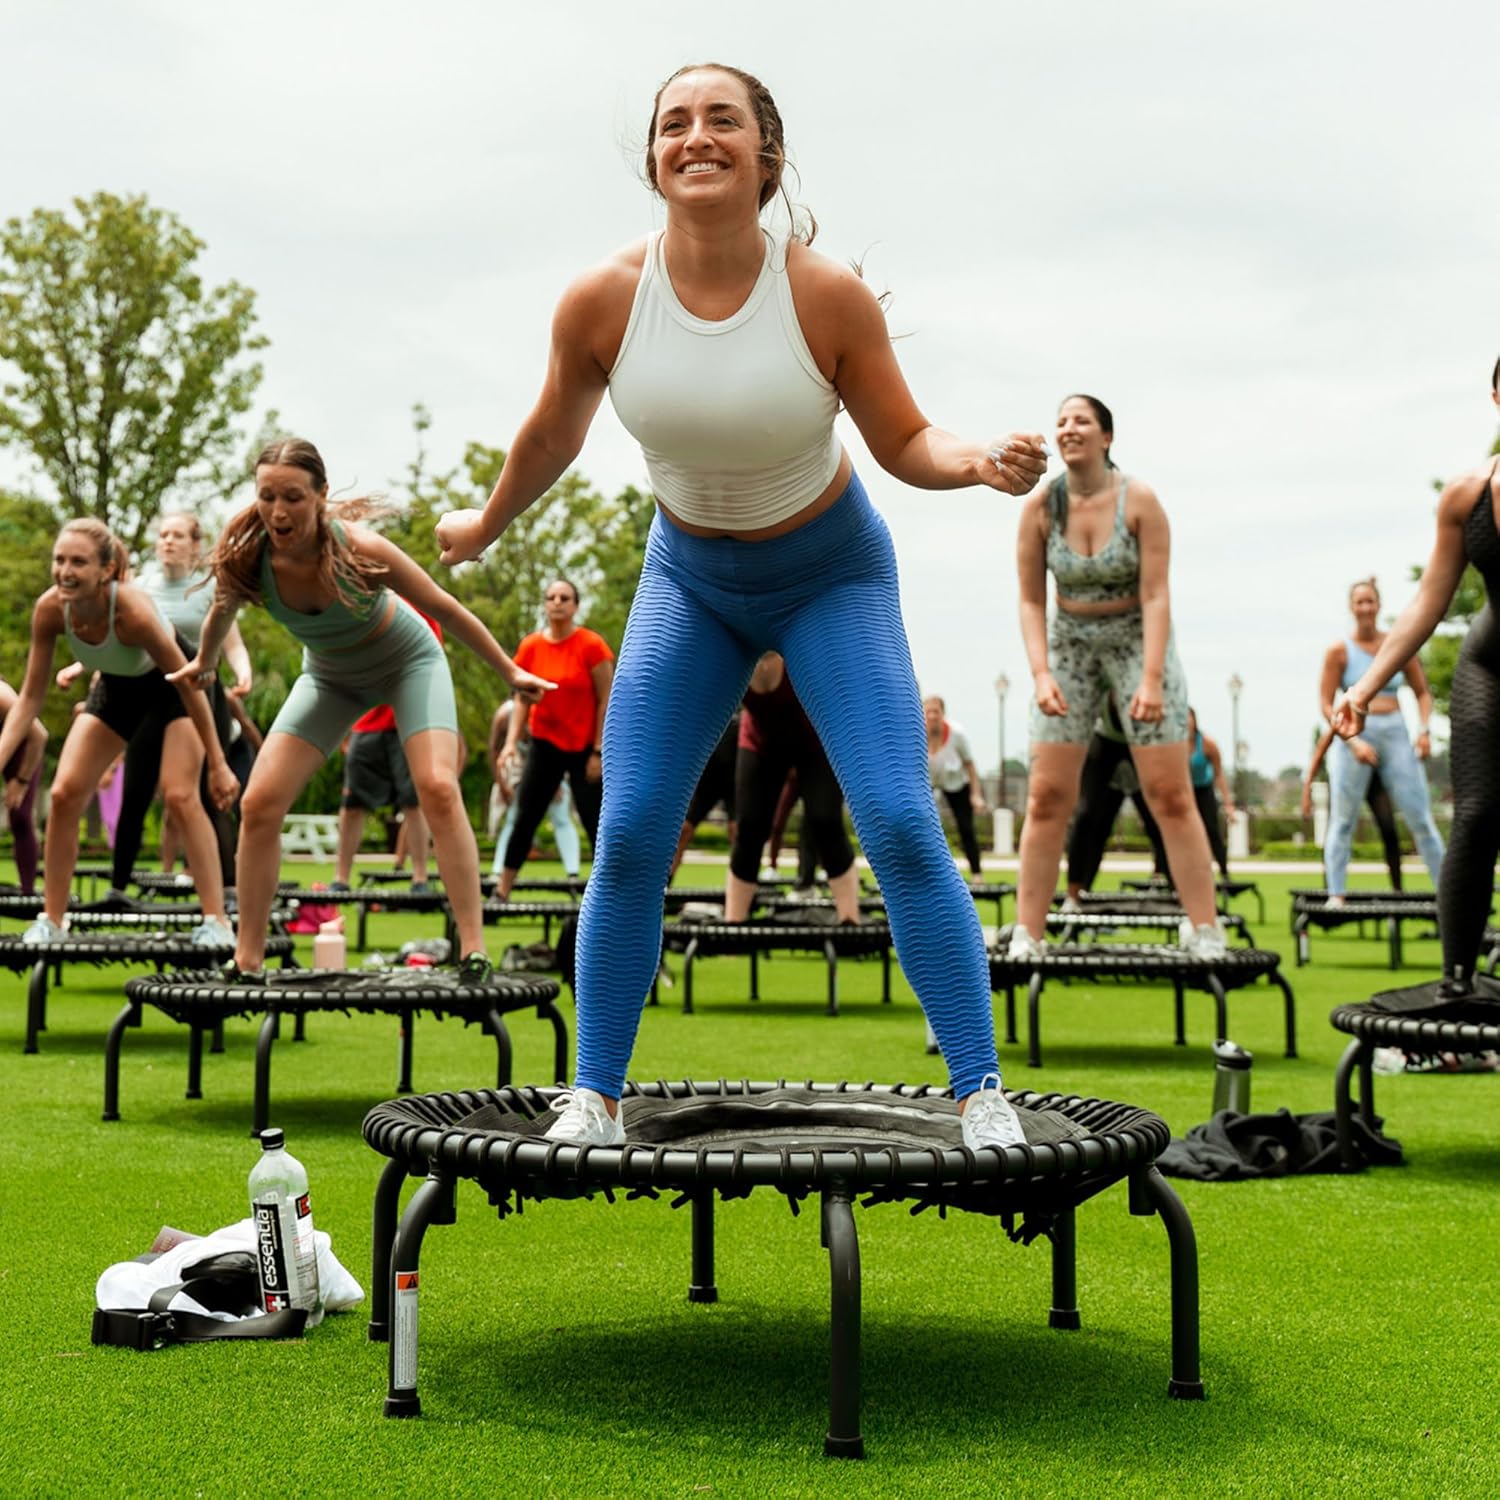
Rebounder trampolines, also known as mini trampolines, are a fantastic way to stay fit. They provide a low-impact workout good for cardiovascular health, strength, and coordination—all while being compact and easy to store at home. This guide covers everything you need to know about choosing the right rebounder, top recommendations, and answers to frequently asked questions.
 Click here for our favorite Rebounder pick
What is a Rebounder Trampoline?
A rebounder trampoline is a smaller, more portable version of a standard trampoline, designed for indoor workouts. Unlike larger backyard trampolines, rebounders are built with fitness in mind and are often used for cardio and strength training routines. They offer a controlled bounce, which is easier on joints and ideal for home workouts. To see my favorite pick, click here.
The Benefits of Using a Rebounder Trampoline
Click here for my favorite rebounder trampoline pick
Rebounders have become increasingly popular for their numerous health benefits, including:
- Improved Cardiovascular Health: Rebounding provides a heart-pumping workout that’s gentle on the joints, making it an excellent cardio option.
- Lymphatic Support: The up-and-down motion helps promote lymphatic drainage, which can support the body’s natural detox process.
- Core and Muscle Strengthening: Rebounding requires balance, engaging your core, legs, and glutes.
- Stress Relief: Rebounding can be a fun, mood-boosting workout that reduces stress and releases endorphins.
Types of Rebounder Trampolines
When choosing a rebounder, it’s helpful to know the different types available:
- Spring vs. Bungee Rebounders: Spring rebounders are often firmer, while bungee models offer a smoother, quieter bounce, which is gentler on the joints.
- Foldable vs. Non-Foldable Models: Foldable rebounders are easy to store and transport, while non-foldable ones tend to offer more stability.
- With or Without Handlebars: Some rebounders come with handlebars, which add extra stability. This feature is useful for beginners or those who need additional support during workouts.
Click here for our favorite Rebounder pick
Key Considerations When Buying a Rebounder Trampoline
To choose the best rebounder for your needs, consider the following:
- Size and Weight Capacity: Choose a size that fits your available space and ensure the weight capacity matches the user.
- Bounce Quality: Look for models with high-quality springs or bungees to ensure a comfortable and effective workout.
- Durability and Build Quality: Opt for sturdy frames and materials that will hold up over time, especially if you plan to use the trampoline frequently.
- Safety Features: Look for safety additions like non-slip mats, stable frames, and protective coverings over springs or bungees.
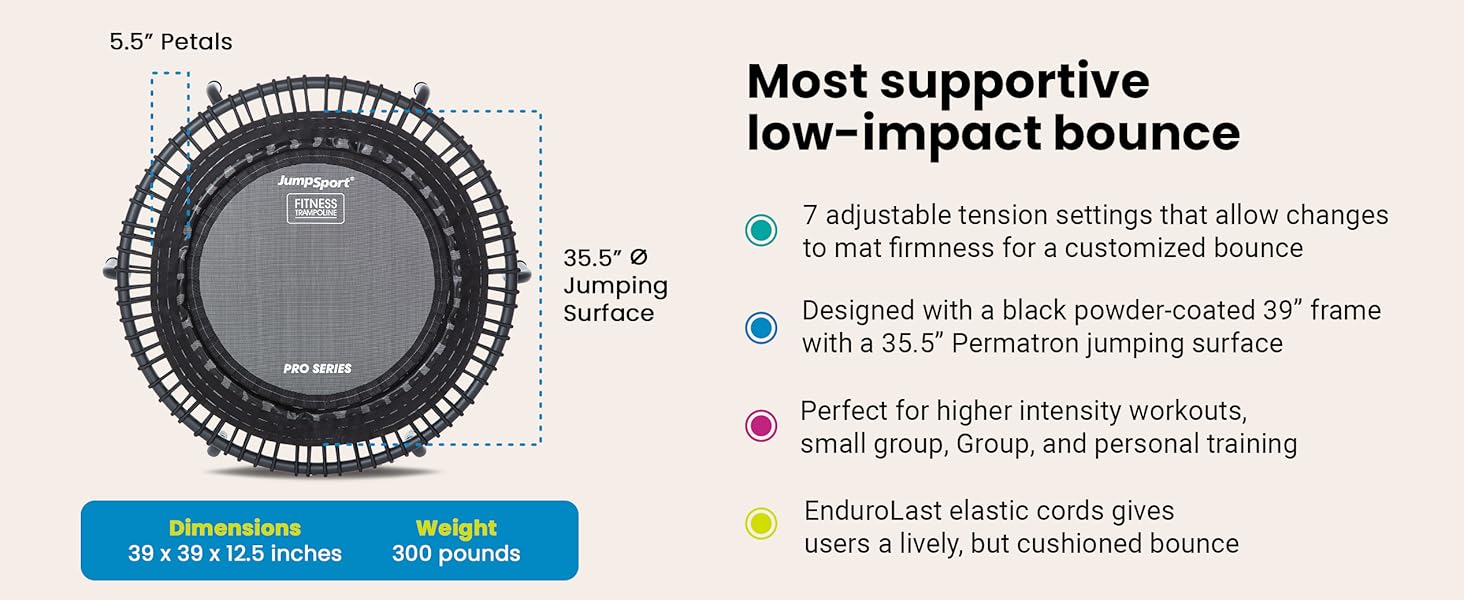
Top Rebounder Trampolines for Home Workouts
Here are some of the best rebounder trampolines available for home use:
| Brand/Model | Features | Size | Price Range |
|---|---|---|---|
| Leaps & Rebounds | Quiet bungee cords, large bounce area, sturdy | 40 inches | Affordable |
| JumpSport 250 | Silent FlexBounce, stable no-tip frame, workout DVD | 250 sq. in bounce | Mid-range |
| JumpSport 350 PRO | Adjustable bounce firmness, durable, arched legs | 35.5 inches | Higher-end |
| MaXimus Pro | Foldable, comes with resistance bands, workout DVD | Compact | Mid-range |
| JumpSport 370 | Customizable tension, stable arched legs | 39 inches | Higher-end |
These models offer different features to suit a range of fitness needs and budgets. Each of them is known for stability, high-quality bounce, and additional features that enhance the workout experience.

Top Exercises for Your Rebounder Trampoline
Rebounders provide a variety of workout options that are low-impact yet effective. Here are some popular exercises:
- Basic Bounce: A simple exercise to warm up and engage the whole body.
- Jumping Jacks: These are great for increasing heart rate while toning arms and legs.
- High Knees: Improve balance and strengthen the core by alternating knee lifts.
- Jogging in Place: This cardio option mimics running while reducing impact on joints.
Rebounder Trampoline Maintenance and Safety Tips
To keep your rebounder in top shape, follow these maintenance and safety tips:
- Check for Wear and Tear: Regularly inspect bungees, springs, and the frame for any signs of wear.
- Use on a Stable Surface: Place your rebounder on a flat, stable surface to avoid tipping.
- Clean as Needed: Wipe down the mat and frame regularly to keep your equipment in good condition.
Frequently Asked Questions (FAQ)
What is the difference between a rebounder and a mini trampoline?
Both are small trampolines, but rebounders are specifically designed for fitness, providing a softer, low-impact bounce ideal for cardio and toning exercises.
Can a rebounder help with weight loss?
Yes, rebounders are excellent for weight loss because they provide a full-body workout that boosts cardiovascular health, builds muscle, and burns calories effectively.
Are rebounders safe for all ages?
Generally, yes, rebounders are safe for most ages, but children should use them under adult supervision.
How much space do I need for a rebounder trampoline?
Most rebounders need about 3-4 feet in diameter of floor space, plus enough clearance overhead for safe jumping.
Do rebounders require assembly?
Some models arrive fully assembled, while others require setup. Many brands provide tools or instructions to make assembly simple, but it’s best to check with the manufacturer.
Click here for our favorite Rebounder pick
Final Thoughts
Rebounder trampolines offer an effective, versatile way to work out from the comfort of home. With so many options available, you can easily find a model that fits your workout style, space, and budget. Whether you’re looking to improve cardio health, strengthen your core, or just have a bit of fun, a rebounder trampoline is a fantastic addition to any fitness routine.
In-Ground Trampoline Drainage: How to Keep Your Pit Dry and Safe
Installing an in-ground trampoline is a great way to blend fun and aesthetics into your backyard. But many homeowners quickly realize that digging a hole in the ground creates one major challenge: drainage. Without proper planning, your trampoline pit can turn into a muddy, flooded mess. This guide walks you through everything you need to know to ensure your in-ground trampoline stays dry, safe, and functional year-round.
Why Drainage Matters
-
Safety: Standing water can lead to rusted springs, mold growth, and slippery surfaces.
-
Structural Integrity: Saturated soil can erode or collapse around the trampoline frame.
-
Maintenance: Poor drainage means frequent cleaning and potential long-term damage.
Step-by-Step: How to Handle In-Ground Trampoline Drainage
1. Design the Pit with Drainage in Mind
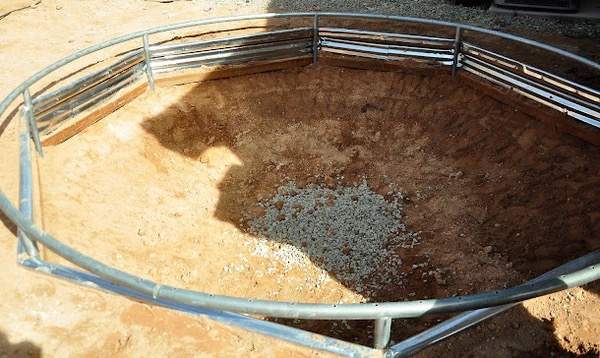
Dig the hole slightly deeper than the trampoline frame to allow room for gravel or a drainage system. The pit should also slope gently to one side to encourage water flow toward your drainage solution.
2. Add a Gravel Drainage Base
At the bottom of the pit, add 4 to 6 inches of crushed gravel. This allows water to filter through instead of pooling directly under the trampoline and provides a stable foundation.
3. Choose the Right Drainage System
Depending on your yard’s conditions, you’ll need one of these common solutions:
Option A: French Drain
-
What it is: A trench filled with gravel and a perforated pipe.
-
How it works: Redirects water away from the trampoline pit to a safe runoff area.
-
Best for: Slightly sloped yards or moderate drainage issues.
Option B: Sump Pump System
-
What it is: A pump installed in a basin at the lowest point of the trampoline pit.
-
How it works: Automatically pumps out water during rain.
-
Best for: Flat yards, heavy clay soil, or frequent flooding.
Option C: Dry Well (Soakaway Pit)
-
What it is: A buried container or gravel-filled pit that holds water and slowly disperses it.
-
How it works: Collects water and lets it gradually seep into the soil.
-
Best for: Yards with decent drainage and moderate rainfall.
4. Improve Drainage Around the Trampoline
Make sure the surrounding ground is graded so that water flows away from the trampoline area. You can also use swales, berms, or garden drains to keep surface water from entering the pit.
5. Ongoing Maintenance
-
Clear leaves and debris from gravel and drainage pipes.
-
Check for standing water after storms.
-
Test sump pumps every season to ensure they still function.
Bonus Tip: Use a Weather-Resistant Cover
When not in use, cover your trampoline to prevent rain from collecting in the pit. This simple step can significantly reduce water issues.
FAQs
Q: Can I just use gravel without any other drainage system?
A: Gravel helps with minor water control, but without a way to move water out of the pit, you’re still at risk for flooding.
Q: How do I know if I need a sump pump?
A: If your yard retains water after rain or your pit stays wet for more than 24 hours, a sump pump is a smart investment.
Q: Can I add drainage to an existing trampoline setup?
A: Yes, you can retrofit a French drain or sump pump into most existing pits without redoing the entire area.
Conclusion
In-ground trampolines are a sleek backyard upgrade—but without proper drainage, they can cause more headaches than joy. By planning your pit design carefully and using the right drainage method for your yard, you can ensure your trampoline stays safe, dry, and low-maintenance all year long.
How to Install an In-Ground Trampoline
Installing an in-ground trampoline can significantly enhance your backyard, creating a safer and more visually appealing play space. Here’s a detailed, step-by-step guide to help you smoothly complete the installation.
Step 1: Planning and Preparation
Choose an area with flat ground, ample surrounding space, and no underground utilities or significant tree roots. Verify local building codes or HOA guidelines to ensure your installation complies with any applicable regulations.
Tools and Materials Needed:
- Trampoline kit (frame, springs, mat, safety pads)
- Excavation equipment (shovel or mechanical excavator)
- Measuring tape
- Marking paint or stakes and string
- Retaining wall materials (treated wood, galvanized steel panels, or retaining wall blocks)
- Gravel or drainage pipe
- Leveling tool
- Backfill soil and turf
- Safety net enclosure (optional but recommended)
Step 2: Marking and Excavation
Using your assembled trampoline frame as a template, mark an area slightly larger than its dimensions (2-5 inches extra) to allow room for installation adjustments.
Carefully remove the top layer of grass or turf, setting it aside for later. Begin excavation, shaping the hole in a bowl-like form, with the deepest part in the center, adhering precisely to the depth recommendations provided by your trampoline manufacturer.
Step 3: Drainage Installation
Proper drainage is needed to prevent water accumulation beneath your trampoline. In areas that are prone to heavy rain or poor drainage, consider implementing one of these solutions:
- Soakaway Pit: Dig a pit approximately 2 feet by 2 feet at the hole’s deepest point, filling it with gravel to help disperse water naturally.
- Drainage Pipe: Lay perforated drainage pipe around the perimeter at the bottom of the hole, ensuring it slopes gently away from the trampoline area to direct water away efficiently.
Step 4: Building Retaining Walls
Construct robust retaining walls around the perimeter of your excavation to prevent soil erosion and maintain structural integrity. Here’s how to build a reliable retaining wall:
- Treated Wood: Use pressure-treated timber, ensuring boards are firmly secured using galvanized steel stakes or posts driven into the ground.
- Galvanized Steel Panels: Install metal panels designed specifically for in-ground trampoline installations, securing them with stakes or anchor systems provided by manufacturers.
- Retaining Wall Blocks: Stack interlocking blocks, starting at a firm base level, making sure to stagger each row for added stability. Backfill carefully as you build upward.
Step 5: Frame Assembly and Placement
Assemble the trampoline frame according to your manufacturer’s instructions, ensuring all connections are secure. Carefully lower the assembled frame into the excavated hole, ensuring it sits flush and level with the surrounding ground surface.
Step 6: Attaching Mat and Springs
Attach the jumping mat by evenly placing the springs. Begin by positioning springs at the 3, 6, 9, and 12 o’clock positions to evenly distribute tension. Then continue attaching the remaining springs uniformly around the trampoline frame.
Step 7: Backfilling and Finishing Touches
Fill the gaps between the trampoline frame and the excavation walls using the set-aside soil, compacting it firmly to ensure stability. Replace the saved turf around the trampoline edges, creating a seamless visual transition.
Step 8: Installing Safety Components
Attach safety pads securely over the springs and frame to protect jumpers from injuries. Installing a safety net enclosure around your trampoline is highly recommended, especially if children use it, to prevent accidental falls.
Step 9: Final Inspection
Perform a detailed inspection to ensure your trampoline is level, stable, and secure. Conduct a test bounce to verify proper functionality and safety.
The Lifespan of Springfree Trampolines: A Comprehensive Guide
Springfree trampolines stand out as a long-lasting, high-quality investment for families seeking a durable and safe backyard trampoline. With a lifespan of at least ten years—and often exceeding that with proper care—these trampolines are designed to withstand years of active use. Their innovative design, premium materials, and industry-leading ten-year warranty make them one of the most reliable options on the market.

Why Springfree Trampolines Last Longer
Springfree trampolines are built to outlast traditional spring-based trampolines by eliminating common points of failure. Unlike conventional models that use metal springs prone to rust and weakening over time, Springfree trampolines utilize flexible composite fiberglass rods, which are significantly more durable. The powder-coated steel frame is corrosion-resistant, and the UV-stabilized polypropylene mat resists weather-related wear and tear.
With rigorous testing that includes millions of simulated jumps and thousands of hours of exposure to extreme weather conditions, Springfree trampolines are engineered for longevity. Even after a decade of use, many units remain in excellent condition with minimal maintenance required.
Design Features That Enhance Durability
Springless Jumping Mechanism
Traditional trampolines rely on metal springs, which stretch and corrode over time, often needing replacement within a few years. Springfree trampolines replace these with composite rods positioned beneath the jumping surface, eliminating one of the most common failure points. These rods offer greater flexibility and durability, making them three times stronger than steel and resistant to wear.
Frame and Structural Integrity
The frame of a Springfree trampoline is constructed with galvanized and powder-coated steel, providing three layers of rust protection. Unlike traditional trampolines where the frame is exposed and susceptible to impact damage, Springfree’s frame is placed beneath the mat, shielding it from direct weather exposure and collisions.
UV-Stabilized Jumping Mat and Safety Net
Sun exposure is a major reason outdoor trampolines degrade. Springfree trampolines use a UV-stabilized polypropylene mat that withstands continuous sun exposure without fraying or weakening. The safety net is made using a high-strength lockstitch knitting method, similar to deep-sea fishing nets, making it more resistant to tearing and UV damage than standard trampoline enclosures
Cost vs. Lifespan: Is a Springfree Trampoline Worth It?
Although Springfree trampolines have a higher upfront cost, their long lifespan makes them more cost-effective than cheaper alternatives that require frequent repairs or replacements.
| Trampoline Type | Initial Cost | Avg. Lifespan | Cost per Year |
|---|---|---|---|
| Springfree | $1,200 – $2,500 | 10-15 years | $80-$250 |
| Premium Spring-Based | $850 – $1,500 | 8-10 years | $85-$188 |
| Mid-Range Spring-Based | $300 – $850 | 3-8 years | $100-$283 |
| Budget Spring-Based | $100 – $300 | 1-3 years | $100-$300 |
Considering the potential for over a decade of use, the cost per year of ownership is lower than most traditional models, making it a solid long-term investment.

Factors That Affect Springfree Trampoline Lifespan
Weather and Climate Conditions
While Springfree trampolines are built to endure all types of weather, prolonged exposure to extreme sun, heavy snow, or high winds can impact longevity. Using a weather cover and clearing off accumulated snow helps prevent unnecessary strain on the materials.
Frequency and Type of Use
Springfree trampolines are tested for millions of jumps, but excessive roughhousing, multiple jumpers exceeding weight limits can accelerate wear and tear. Following safety guidelines and ensuring proper weight distribution can extend the trampoline’s lifespan.
Installation and Maintenance
Proper assembly ensures structural integrity and longevity. Incorrect installation can lead to unnecessary stress on components. Regular inspections and minor upkeep, such as tightening bolts and cleaning the mat, help keep the trampoline in optimal condition.
How to Maximize the Lifespan of a Springfree Trampoline
✅ Clean the mat and net monthly using dish soap and water to prevent buildup of dirt and debris.
✅ Inspect the rods, frame, and netting every few months for signs of wear.
✅ Remove excess snow accumulation to avoid stress on the frame.
✅ Use a weather cover when the trampoline is not in use for extended periods.
✅ Check rod connections and bolts to ensure secure attachments.
While Springfree trampolines require minimal maintenance compared to traditional models, these simple steps can help keep them in top condition for well over a decade.
Common Questions About Springfree Trampoline Longevity
What happens if a part wears out after 10 years?
Springfree offers replacement parts for nets, mats, and rods, making it easy to maintain the trampoline even after the warranty expires.
Can I leave my Springfree trampoline outside year-round?
Yes, Springfree trampolines are designed for all-weather use, but using a weather cover and periodically checking for signs of wear can extend their lifespan.
How does Springfree compare to brands like Skywalker or Vuly?
- Skywalker trampolines are budget-friendly but typically last 3-6 years.
- Vuly trampolines offer good durability (8-10 years) but still use springs, making them more prone to wear than Springfree.
Do I need to anchor a Springfree trampoline?
In high-wind areas, anchoring is recommended to prevent movement or tipping during storms.
Can I install a Springfree trampoline myself?
Yes, DIY installation is possible with 2-3 people and typically takes 2-3 hours. Professional installation is available for those who prefer assistance.
Final Thoughts: Is a Springfree Trampoline a Good Investment?
For families looking for a safe, durable, and low-maintenance trampoline, Springfree is among the best choices on the market.
✅ Lasts 10-15+ years, outlasting most traditional trampolines.
✅ Safer design with no metal springs or exposed frame.
✅ Minimal maintenance with high-quality, weather-resistant materials.
✅ 10-year comprehensive warranty covering all parts.
While the upfront cost is higher than many traditional trampolines, the long-term savings on repairs and replacements make it a worthwhile investment. When evaluated on a cost-per-year basis, Springfree offers better value than most other trampoline brands.
For those seeking a trampoline that lasts well beyond the competition, Springfree is a clear winner.
How Long Do Trampolines Last?
When you’re investing in a trampoline, one of the biggest questions is: “How long will this last?” After all, you want to make sure it’s not only worth the money but also safe and enjoyable for years to come. The good news? The lifespan of a trampoline can vary greatly depending on its quality, usage, and how well it’s maintained. A cheap trampoline might need replacing after just a couple of years, while a premium one can last well over a decade.
In this guide, we’ll break down what determines how long a trampoline will last, what you can do to extend its life, and how to spot when it’s time to replace it.

How Long Do Trampolines Typically Last?
The lifespan of a trampoline depends on its build quality and care. Here’s a general breakdown:
- Cheap trampolines: 1-3 years
- Average trampolines: 3-8 years
- Premium trampolines: 5-10+ years
- Springfree trampolines: 10+ years with proper care
Premium trampolines often justify their price tags by using high-quality materials and offering warranties that reflect their durability. However, even the best trampolines need regular maintenance and protection from the elements to live up to their full potential.
The Key Factors That Affect a Trampoline’s Lifespan
Quality of Materials
The materials a trampoline is made from are the biggest factor in determining how long it lasts. A high-quality trampoline includes:
- Galvanized steel frames: Frames coated with zinc resist rust and corrosion, making them far more durable, especially in humid or coastal environments.
- High-strength polyester nets: Knot-free and tightly woven nets last longer and provide better safety.
- UV-resistant materials: Mats, nets, and padding exposed to the sun degrade quickly without UV protection.
- Sturdy springs or rods: Springs lose their tension over time, so durable, rust-proof springs or springless designs help maintain bounce.
Trampolines built with these features not only last longer but are also safer to use.
The Impact of Weather and Environment
Where you live and how you protect your trampoline from the elements can dramatically impact its lifespan.
- UV light is the leading cause of material breakdown. Prolonged exposure to the sun weakens mats, nets, and padding.
- Harsh weather like heavy rain, snow, and extreme wind can cause structural damage or rust over time.
- Coastal areas with salt in the air accelerate rusting on the trampoline’s frame if it’s not well-protected.
How to protect it:
- Use a sunshade or weather cover to shield the trampoline.
- Place the trampoline in a shaded area when possible.
- Store it or secure it properly during storms, snow, or high winds.
How Often and How It’s Used
The frequency and intensity of use also determine how quickly a trampoline wears out.
- A trampoline used daily by multiple kids will naturally wear faster than one used occasionally.
- Exceeding the weight limit puts extra stress on the springs, mat, and frame, leading to quicker deterioration.
- Trampolines tested for millions of jumps, like Springfree Trampolines, tend to have the longest lifespans.
If you want your trampoline to last, set some ground rules:
- Limit the number of jumpers at a time.
- Ensure no one exceeds the trampoline’s weight limit.
- Encourage safe play to minimize wear and tear.
Maintenance Makes All the Difference
Regular care and maintenance can add years to your trampoline’s life. Even the highest-quality trampolines need some upkeep:
- Clean regularly: Remove debris and clean the mat with mild soap and water. Avoid harsh chemicals.
- Inspect for damage: Check the mat, springs, net, and frame for wear or rust. Replace damaged parts immediately.
- Secure during bad weather: Use covers, anchors, or disassemble and store your trampoline during storms or heavy snow.
- Replace worn parts: Over time, springs, mats, and nets will wear out. Replacing them as needed keeps the trampoline safe and usable.
With proper maintenance, even a mid-range trampoline can last far longer than its advertised lifespan.
How to Make Your Trampoline Last Longer
If you’ve invested in a trampoline, it’s worth taking a few extra steps to ensure it holds up for years of fun:
- Install the trampoline properly, following the instructions carefully.
- Clean it once or twice a month to keep it free of debris and buildup.
- Use weather-related accessories like sunshades, weather covers, or anchors.
- Set rules for usage, such as no roughhousing or exceeding weight limits.
- Inspect it regularly for wear, rust, or damage.
- Replace worn parts like nets, springs, or mats as soon as issues appear.
- Choose a high-quality trampoline from the start if you expect frequent use.
These simple steps can add years to your trampoline’s life and ensure it remains a safe, fun space for your family.
Why Springfree Trampolines Stand Out
Springfree Trampolines are designed to last longer than traditional trampolines. With:
- A 10+ year lifespan backed by a full 10-year warranty on all parts.
- Materials that are UV-resistant and triple-coated to resist rust.
- Rigorous testing to withstand up to 3 million jumps.
If longevity, safety, and low maintenance are priorities, investing in a Springfree Trampoline can offer peace of mind and value for your money.
When to Replace Your Trampoline
Even with the best care, trampolines don’t last forever. Here are signs it might be time to replace yours:
- The mat is torn, sagging, or no longer bounces properly.
- Springs are rusted, broken, or lose their tension.
- The frame shows signs of bending, rusting, or instability.
- The safety net is torn or doesn’t stay secure.
- Excessive creaking or movement indicates structural issues.
Safety should always come first. If you notice these problems and replacing parts isn’t enough, it’s time to consider getting a new trampoline.
Final Thoughts
How long a trampoline lasts comes down to its quality, how it’s used, and how well it’s maintained. While cheap trampolines may only last a couple of years, a high-quality trampoline with proper care can provide fun for over a decade.
Protect your investment by choosing a durable trampoline, following maintenance tips, and shielding it from harsh weather. Your trampoline can remain a backyard staple for years of safe, joyful jumping.
If you’re ready to invest in one of the longest-lasting options, check out our ultimate trampoline buying guide for recommendations that suit any budget and lifestyle.
Trampoline Tents: DIY Ideas vs. Ready-Made Options
Trampoline tents are a fantastic way to elevate the fun of owning a trampoline. They transform your backyard into a hub of outdoor play, imaginative adventures, or even cozy camping nights. Whether you’re looking for a pre-made solution or want to try your hand at creating a custom tent, there are plenty of options to suit your needs.
In this guide, we’ll explore both approaches, compare their benefits, and provide tips to help you decide which trampoline tent is right for you.
What is a Trampoline Tent?
A trampoline tent is an enclosure designed to fit over a trampoline, turning it into a sheltered play area or a mini-campsite. These tents add a whole new level of fun to trampolines by offering:
- Weather protection: Shielding from the sun, light rain, or wind.
- Safe play environment: Keeping kids contained while they bounce.
- Creative play opportunities: Acting as a fort, camping tent, or private hideaway.
Ready-Made Trampoline Tents
Benefits of Buying Pre-Made
Investing in a ready-made trampoline tent comes with several advantages:
- Convenience: Designed for easy assembly and disassembly.
- Durability: Built from materials like weather-resistant polyester for longevity.
- Safety: Professionally designed to minimize risks.
Key Features to Look For
When shopping for a trampoline tent, consider:
- Size compatibility: Ensure the tent fits your trampoline’s dimensions.
- Weather resistance: Look for materials that can withstand UV rays and rain.
- Ventilation: Mesh windows or breathable fabrics prevent overheating.
- Ease of assembly: Simple setups save time and effort.
Popular Options
Here’s a comparison of some popular trampoline tents:
ProductSizes AvailableKey FeaturesMaterialPrice Range
12ft Trampoline Tent 12ft Zippered entrance, weather-resistant Polyester $99 – $120
Acon Trampoline Tent 12ft, 14ft, 15ft Water-resistant, mosquito netting Polyester + PU $150 – $180
Steelway 14FT Tent 14ft UV protection, ventilation windows Durable fabric $159 – $200
These options provide fun, safety, and durability for a variety of trampoline sizes.
DIY Trampoline Tent Ideas
Why Consider DIY?
For those who love crafting or saving money, a DIY trampoline tent is an excellent alternative. DIY options offer:
- Cost savings: Use materials you may already have.
- Creativity: Design a unique tent tailored to your needs.
- Family fun: A great project to involve kids in.
DIY Methods
Here are three popular DIY approaches:
- Simple Sheet Tent
- Materials: Large sheet, clothespins, ropes.
- Steps:
- Drape the sheet over the trampoline frame.
- Secure it with clothespins or clips.
- Tie ropes around the edges for added stability.
- Pros: Quick and inexpensive.
- Cons: Less durable, vulnerable to strong winds.
- Camping Tent Approach
- Materials: Standard camping tent, sleeping bags, decorations.
- Steps:
- Place a camping tent directly on the trampoline mat.
- Decorate with sleeping bags and fairy lights for ambiance.
- Pros: Easy to set up and great for camping.
- Cons: Limited to tent sizes and shapes.
- PVC Pipe Dome
- Materials: PVC pipes, tarp, connectors.
- Steps:
- Construct a dome frame using PVC pipes.
- Cover the frame with a tarp or waterproof fabric.
- Secure the structure to the trampoline frame.
- Pros: Highly customizable and durable.
- Cons: Requires tools and effort.
Choosing the Right Option
DIY vs. Ready-Made: Pros and Cons
FactorDIY OptionsReady-Made Options
Cost Low to moderate Moderate to high
Effort Requires creativity and time Minimal effort
Durability Depends on materials used Built to last
Customization Fully customizable Limited customization
When to Choose Each:
- DIY: Ideal for short-term use or families who enjoy creative projects.
- Ready-Made: Best for those seeking durability and convenience for long-term use.
Tips for Both Approaches
Safety First
- Ensure materials are securely fastened to prevent collapse.
- Avoid using the trampoline during strong winds.
- Supervise children to ensure safe play.
Maintenance Tips
- Store tents indoors when not in use to prolong their lifespan.
- Inspect regularly for wear and tear, especially after storms or heavy use.
Creative Uses for Trampoline Tents
- Backyard Camping: Create a cozy retreat for family camping nights.
- Outdoor Reading Nook: Add pillows and blankets for a relaxing space.
- Themed Play Areas: Turn the trampoline into a pirate ship, castle, or spaceship.
Conclusion
Trampoline tents offer endless possibilities for outdoor fun, whether you choose a DIY solution or a ready-made product. Assess your budget, time, and needs to decide the best option for your family.
Can You Jump on a Trampoline While Pregnant?
Pregnancy brings many changes to your body, and choosing the right activities becomes essential for your safety and your baby’s health. Jumping on a trampoline poses specific risks during pregnancy. Below, we break down the key considerations, safety concerns, and alternatives for staying active while expecting.
Is Jumping on a Trampoline Safe During Pregnancy?
In general, trampolining is not recommended during pregnancy due to the following factors:
- Increased Risk of Falling: The vigorous bouncing involved in trampolining increases your risk of losing balance and falling, which could harm both you and your baby.
- Weakened Stability: Pregnancy hormones like relaxin loosen ligaments and joints, which make people more prone to injuries such as sprains or pelvic instability.
- Shifting Center of Gravity: As pregnancy progresses, a growing belly changes balance, making activities like trampolining harder to control.
Key Risks by Pregnancy Trimester
First Trimester
- What’s Happening: Your body may still feel relatively normal, and your center of gravity hasn’t changed significantly.
- Risks:
- Hormonal changes can affect joint stability and increase the risk of dizziness and falls.
- Even if the baby is small and well-protected, a fall could result in injuries to you.
- Should You Jump?: It’s better to avoid trampolining, but if you must, keep it low-intensity and consult your doctor first.
Second and Third Trimesters
- What’s Happening: Your belly grows, your center of gravity shifts, and balance becomes more challenging.
- Risks:
- Falling can result in severe complications, such as placental abruption or premature labor.
- The impact of jumping can strain weakened pelvic floor muscles, increasing the risk of incontinence or pelvic organ prolapse.
- Should You Jump?: No. The risks far outweigh any benefits at this stage.
Common Concerns About Jumping While Pregnant
- Will the Bouncing Hurt the Baby?
- The baby is cushioned inside the uterus and is not affected by gentle rocking or bouncing. However, the risk of falling or abdominal trauma makes trampolining unsafe.
- What About Light Bouncing or Rebounding?
- Even low-intensity bouncing can compromise your balance and increase the risk of injury, especially later in pregnancy. Always discuss any activity with your doctor.
Safer Alternatives to Trampolining
If you’re looking to stay active during pregnancy, consider these low-risk, pregnancy-safe exercises:
- Prenatal Yoga: Helps improve flexibility, balance, and relaxation.
- Walking: An easy and effective way to maintain cardiovascular health.
- Swimming: Reduces stress on joints while offering a full-body workout.
- Stationary Cycling: A low-impact way to keep moving without risking falls.
Tips for Staying Active Safely During Pregnancy
- Listen to Your Body: Stop immediately if an activity feels uncomfortable or unsafe.
- Consult Your Healthcare Provider: Always seek professional advice before starting or continuing any exercise during pregnancy.
- Focus on Low-Impact Exercises: Prioritize activities that minimize the risk of falling or injury.
- Avoid High-Risk Activities: Activities with potential for trauma or instability, like trampolining, horseback riding, or contact sports, should be avoided.
Final Verdict
While trampolining might seem like a fun way to stay active, the risks during pregnancy—especially in the second and third trimesters—are too significant to ignore. Opt for safer, low-impact exercises to support your health and your baby’s development. Always consult a doctor or midwife before deciding about physical activity during pregnancy.
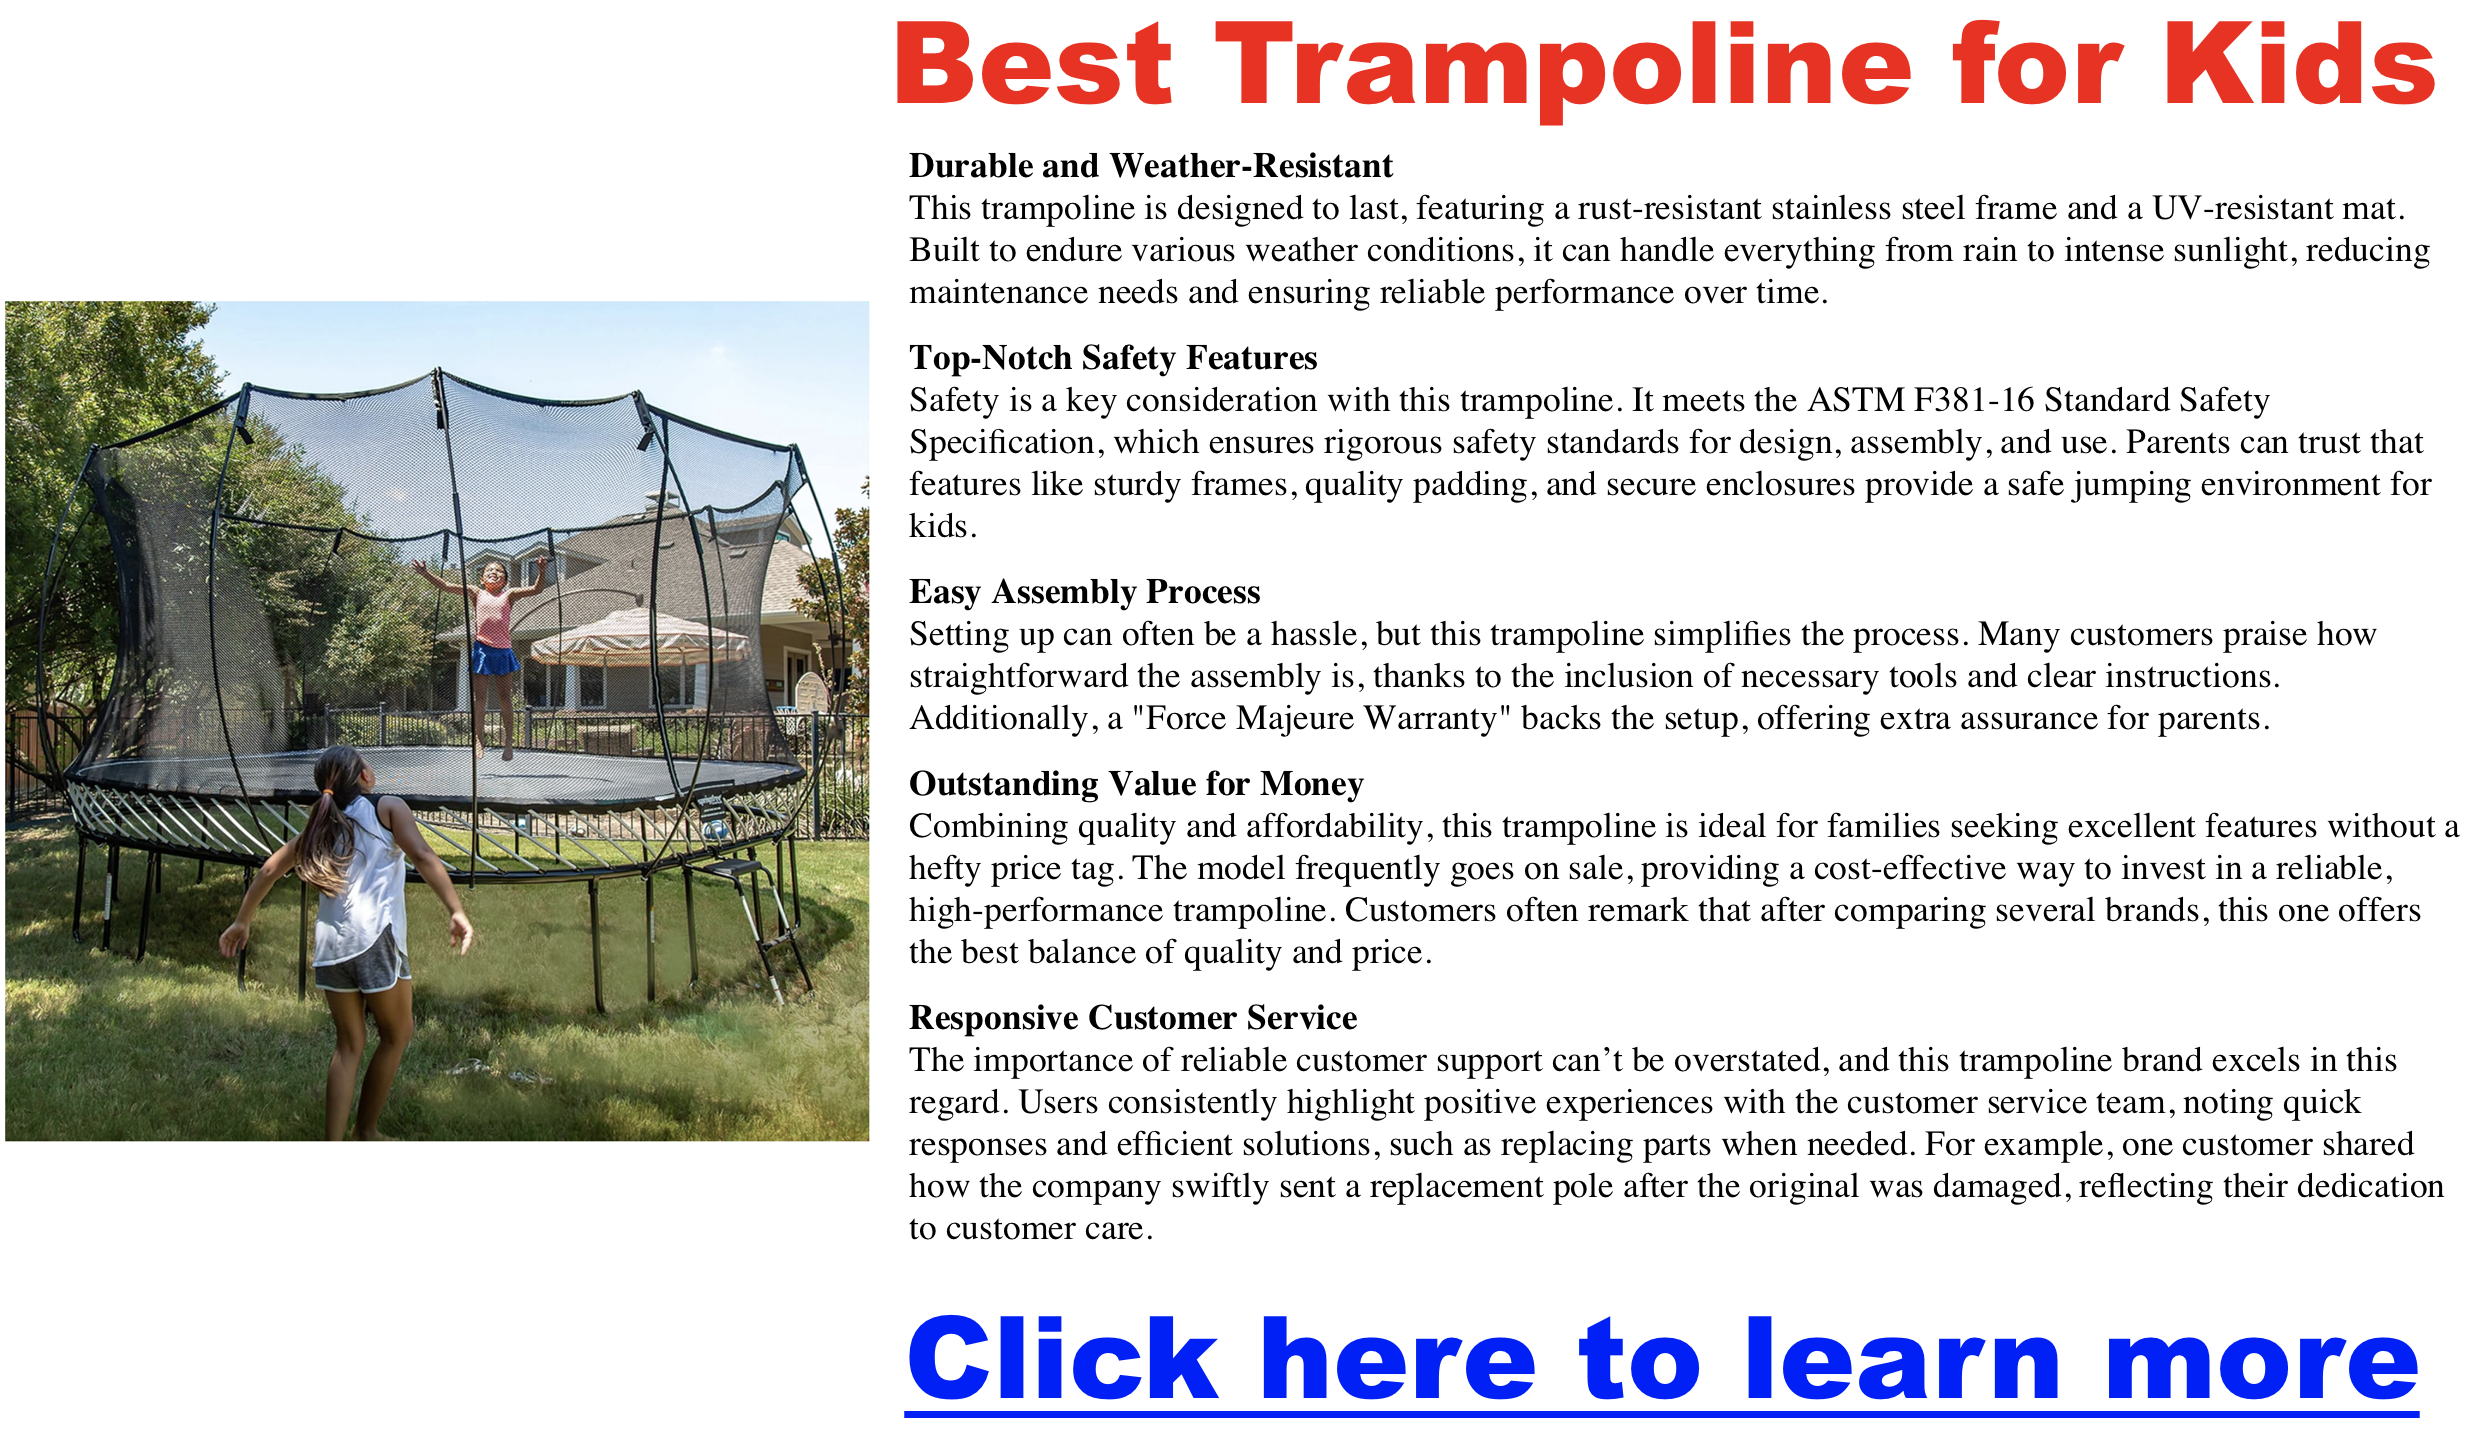
Trampoline Safety: Are They Really Safe for Kids?
Trampolines bring kids hours of energy-burning fun and can even support balance, coordination, and fitness. But as any parent knows, they also come with risks. According to pediatric safety research, the majority of trampoline injuries involve falls, collisions, or contact with springs and frames. That doesn’t mean trampolines are unsafe by default—it means families need the right knowledge, equipment, and supervision.
This guide draws on safety recommendations from pediatricians, consumer safety organizations, and trampoline manufacturers to help you make confident, informed decisions.
Must-Have Safety Features
When choosing a trampoline, prioritize models that incorporate modern safety innovations.
1. Safety Enclosure Nets
A high-quality net is essential to prevent falls. Look for:
-
UV-resistant mesh (to withstand sunlight and weather)
-
A secure entry system (zippers or overlapping closures that kids can’t easily leave open)
-
Nets that attach directly to the mat, leaving no gaps where children could slip through
2. Protective Padding
Thick, weather-resistant padding should cover all springs and frame edges. This reduces the chance of sprains, cuts, or pinches if a child missteps.
3. Stable Access
A wide, non-slip ladder or step system helps children climb safely. For younger kids, choose models with low-to-the-ground access.
Choosing the Right Trampoline
The best trampoline for your family depends on your children’s ages, space, and usage.
-
Size & Weight Capacity: Match the trampoline to the number of children and their ages. Exceeding the recommended weight capacity is a major cause of accidents.
-
Durability: Look for galvanized steel frames, UV-treated nets, and mats tested for high bounce cycles.
-
Brand Reputation: Established brands like Springfree, Skywalker, Acon, and Little Tikes (for toddlers) consistently earn praise for their engineering and compliance with international safety standards.
| Brand / Model | Design | Key Safety Features | Weight Capacity | Best For | Certifications |
|---|---|---|---|---|---|
| Springfree (Round & Oval) | Springless rods (no metal springs) | Hidden frame, SoftEdge shock-absorbing mat, tall FlexiNet enclosure | ~220 lbs per jumper / 1100+ lbs total | Families prioritizing top-tier safety | ASTM, Australian Standards |
| Vuly Thunder Pro (Australia) | Leaf-spring system | Self-closing zipperless net, frame hidden under mat, UV-treated materials | 300 lbs per jumper / 1650 lbs static load | Outdoor families in harsh weather climates | CE, ASTM-equivalent |
| JumpFlex Hero | Steel frame with 80–100 springs | Dual-ring frame, thick foam padding, 360° zippered net, padded curved poles | 550 lbs per jumper | Families needing durability & long warranties | ASTM compliant |
| Acon Air/HD Series (Europe) | Heavy-duty coil springs | Extra-strong galvanized frame, tall net, SafeMat UV mat | No single-user limit / 1650 lbs tested | Serious users, older kids/teens, gymnastic training | ASTM, CE |
| Skywalker | Coil springs with “No-Gap” design | Patented gap-free enclosure system, padded poles, rust-resistant steel frame | 200–800 lbs (depending on size) | Budget-friendly safety-conscious families | ASTM |
| SkyBound Rocket (Mini) | Springs with foam handle | Padded handle, thick PVC pad, ASTM toy safety certified | Up to 220 lbs | Toddlers & small children indoors | ASTM F963, AS4989 |
| Little Tikes (3–7 ft) | Springs or plastic coil | Enclosure nets for larger models, foam-padded bars, low height | 55–100 lbs | Toddlers (ages 3–6), indoor/outdoor play | Toy safety standards |
Safe Setup Practices
Where you place your trampoline is as important as the model you buy.
-
Choose Level Ground: Set up on grass or a soft surface—not concrete. Keep the area free of nearby trees, fences, or furniture.
-
Anchor It: Use ground stakes or sandbags to prevent tipping or movement in high winds.
-
Clear Below: Never allow children or pets to play beneath the trampoline while it’s in use.
Rules for Safer Jumping
Rules make the difference between safe fun and preventable injuries. Experts recommend:
-
One Jumper at a Time: Reduces collisions and “double-bounce” injuries.
-
No Flips or Somersaults: These moves require trained supervision to avoid head and neck injuries.
-
Stay Centered: Encourage kids to jump in the middle, away from springs and edges.
-
Active Supervision: An adult should always be present, enforcing rules and watching for unsafe behavior.
Ongoing Maintenance
Regular upkeep extends the life of your trampoline and keeps it safe:
-
Inspect Often: Replace torn mats, frayed nets, or broken springs immediately.
-
Clean Surfaces: Remove leaves and debris that can create slip hazards.
-
Weather Protection: Use covers or dismantle nets during harsh weather to prevent premature wear.
Optional Safety Accessories
-
Padded Basketball Hoops: If you want extra play options, choose accessories designed specifically for trampolines.
-
Shade Covers: Protect kids from UV exposure while they jump.
-
Anchor Kits: Essential in windy regions.
Understanding the Risks
Even with precautions, trampolines carry risks. The most common include:
-
Falls off the trampoline (why nets are critical)
-
Collisions with other jumpers (solved by the one-at-a-time rule)
-
Improper landings on springs or frames (padding reduces this)
-
Underneath play hazards (kids must be kept out from under the mat)
Knowing these risks helps you stay proactive in preventing them.
Frequently Asked Questions
Are trampolines safe for kids?
Yes—when used responsibly. Choose a trampoline with a safety net, strong padding, and enforce the “one child at a time” rule.
What surface should I place it on?
Level grass is best. Avoid hard surfaces like pavement. Adding mulch or sand underneath further reduces impact.
What’s the right age to start?
Most experts recommend trampolines for children over 6 years old, though toddler-specific models (with lower heights and handles) exist for younger ages.
Do injuries always require a doctor?
Minor sprains may be treated at home, but fractures, head, or neck injuries require immediate medical attention.
Final Thoughts
Trampolines can be a wonderful way for kids to play, get exercise, and enjoy time outdoors. But safety must come first. By investing in a well-designed model, setting it up correctly, and enforcing simple rules, you can give your family the joy of trampolining while minimizing risks.
A little planning and ongoing supervision go a long way—turning trampoline time into safe, happy, healthy play.
15 Foot Kangaroo Hopper Trampoline
Trampolines bring fun, exercise, and family bonding to backyards worldwide, and Kangaroo Hoppers is a recognized name in the trampoline market. The 15-foot model stands out as one of their largest round trampolines, designed to accommodate multiple users while prioritizing safety.
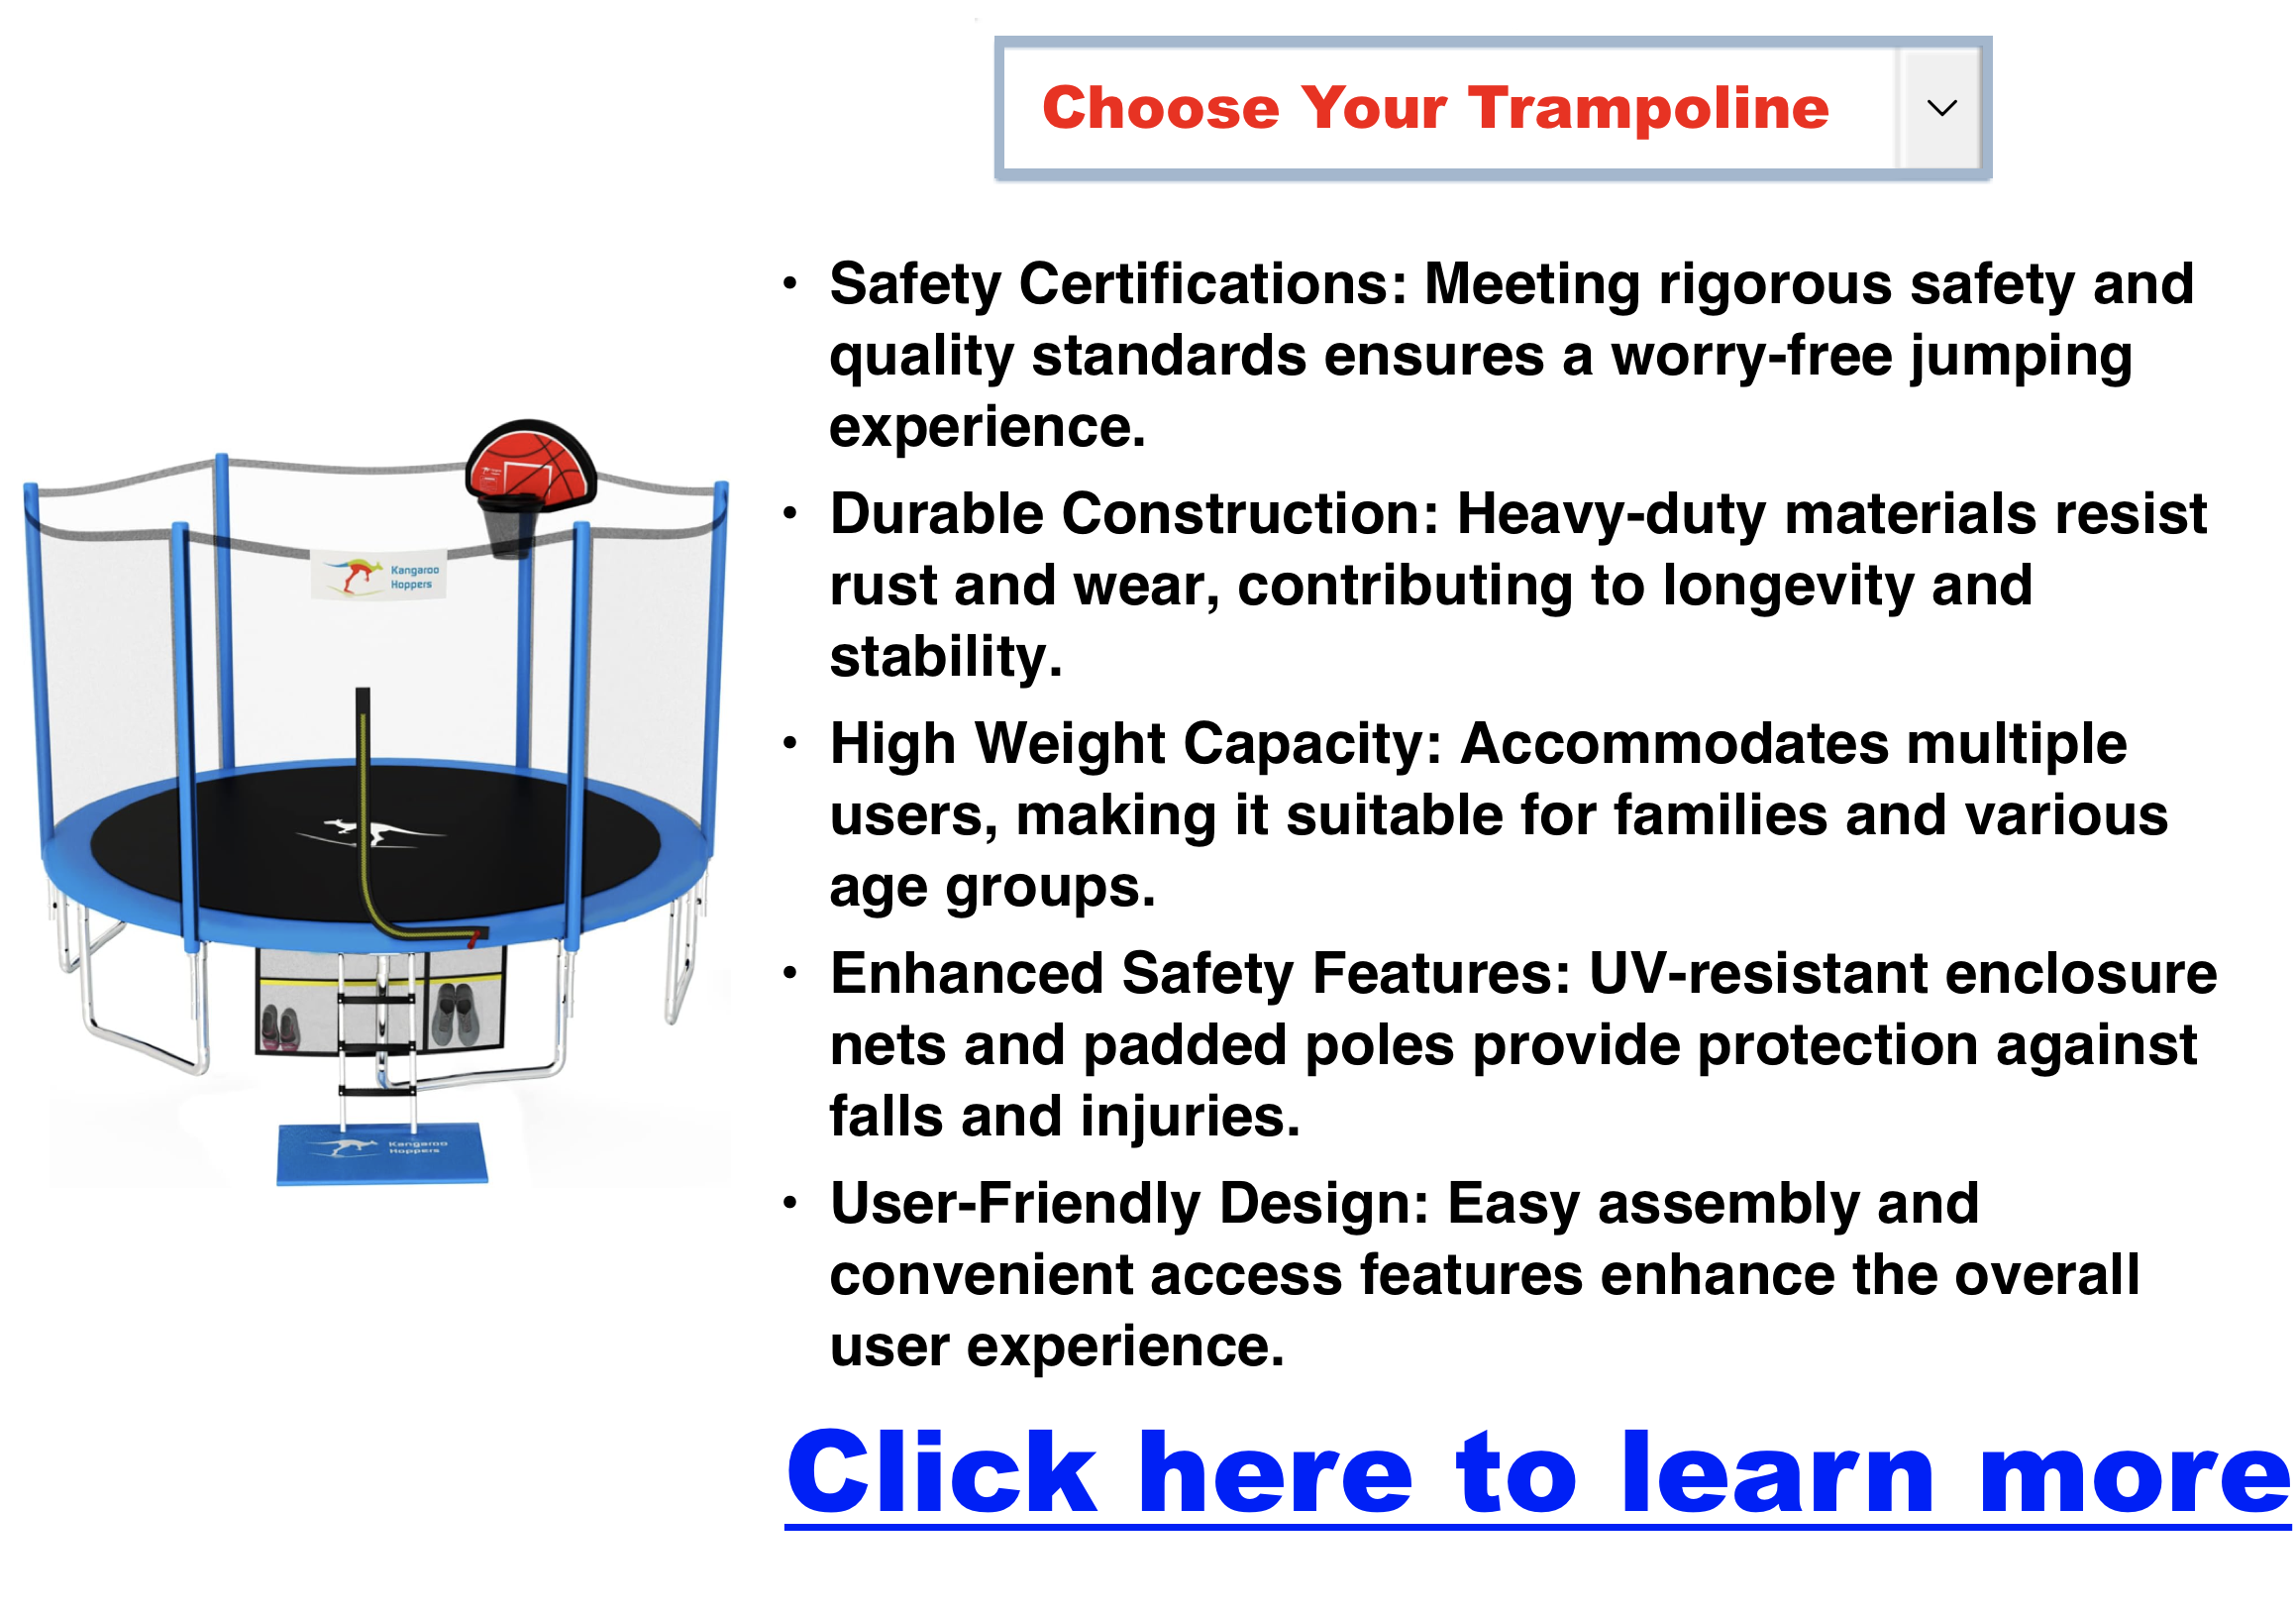
Specifications and Features
Size and Build
- Diameter: 15 feet, providing ample jumping space for kids and adults.
- Frame Diameter: 38mm with a thickness of 1.1mm for durability and support.
- Weight Capacity: Advertised as supporting a static weight of 1500 lbs; however, the ASTM-recommended limit for a single user is 375 lbs.
Spring System
- 72 galvanized springs, each 165mm long, ensure a responsive bounce.
- Springs are coated with a rust-preventive layer to withstand outdoor conditions.
Safety Features
- UV-Resistant Jumping Mat: Maintains integrity and elasticity under prolonged sun exposure.
- Rust-Protective Coating: Keeps springs and metal components in good condition.
- Foam-Padded Poles: Minimizes impact risks for jumpers.
- Dual Zipper Enclosure with Clip: Prevents accidental falls while allowing easy access.
- Outer Net Design with Straight Poles: Provides enhanced stability and safety.
Certifications
The trampoline meets rigorous safety standards, including:
- ASTM F381/F2225
- CE EN-13219
- TUV EN-71
- ISO 9001-2015
Additional Features
Some packages include:
- Basketball Hoop: Adds a fun twist to traditional trampoline use.
- Ladder: Makes entry and exit easy for users of all ages.
Pros of the 15-Foot Kangaroo Hopper Trampoline
- Spacious Jumping Surface:
- Perfect for families and group play, offering plenty of room for fun and exercise.
- Enhanced Safety:
- Features like the enclosure net, foam-padded poles, and rust-resistant materials ensure user protection.
- Durability:
- UV and rust-resistant materials extend the trampoline’s lifespan.
- Aesthetic Appeal:
- It is designed with subtle, visually appealing colors and logos and complements various backyard styles.
- Free Shipping:
- Kangaroo Hoppers provides free shipping within the lower 48 states, saving on delivery costs.
Cons of the 15-Foot Kangaroo Hopper Trampoline
- Challenging Assembly:
- Customers frequently report that assembling the trampoline is time-intensive and confusing, requiring multiple hands and careful attention to instructions.
- Missing or Damaged Parts:
- Some users have experienced frustration due to missing or damaged components upon delivery.
- Structural Concerns:
- A few reviews mention the trampoline folding or collapsing under use, raising doubts about its stability.
- Customer Service Issues:
- Reports of poor customer support, delayed responses, and unresolved issues tarnish the brand’s reputation.
- Mixed Value Perception:
- While some customers find the trampoline worth the price, others feel the build quality doesn’t justify the cost.
Customer Reviews and Ratings
The 15-foot Kangaroo Hopper trampoline has garnered mixed feedback from users. On the Better Business Bureau (BBB) platform, Kangaroo Hoppers has a low rating of 1/5 stars, with 18 complaints closed over the last three years. Most negative reviews focus on product quality, missing parts, and insufficient customer support.
Conclusion
The 15-foot Kangaroo Hopper trampoline offers a spacious jumping surface, several safety features, and free shipping, making it an appealing choice for families. However, challenges such as assembly difficulties, occasional quality issues, and inconsistent customer service may outweigh the benefits for some buyers.
Trampoline Pricing & Finding The Best Deal
Trampolines bring fun and excitement to any backyard, giving both kids and adults hours of enjoyment. But with so many options out there, it can be tricky to figure out which one is worth your money. Whether you’re shopping on a budget or considering a top-of-the-line model, this guide will help you understand what affects trampoline prices and how to choose the best fit for your needs.
Size and Shape: How They Affect Cost
The size and shape of a trampoline are key factors in determining its price. Here’s what to expect:
Mini Trampolines and Rebounders
- Purpose: Ideal for indoor use or fitness routines.
- Price Range: $30 to $300.
Standard Round Trampolines
- Purpose: Perfect for outdoor family use, ranging from 8 to 15 feet in diameter.
- Price Range: $200 to $500.
Larger or Rectangular Trampolines
- Purpose: Often used by athletes or larger families for more bounce and space.
- Price Range: $400 to $3,000.
Key Insight: Rectangular trampolines are typically more expensive than round ones of the same size due to their design and material requirements.
Quality and Materials: The Foundation of Price
Higher-quality trampolines may have a higher upfront cost, but they provide better safety and durability over time.
- Durable Frames:
- Galvanized steel resists rust and ensures long-lasting performance.
- Adds to the cost but offers excellent value for longevity.
- Enhanced Safety Features:
- Thicker padding, sturdy enclosures, and weather-resistant materials improve safety and comfort.
- Expect higher prices for these added features.
Why It Matters: Investing in a well-made trampoline ensures your family’s safety and reduces the need for frequent replacements.
- Brand Reputation: Does It Influence Price?
The brand you choose significantly impacts the cost of your trampoline.
Popular Brands and Their Price Ranges
- Skywalker: $199 to $2,999.
- Zupapa: $339 to $714.
- ACON: $339 to $3,900.
- Jumpzylla: $209 to $469.
- Vuly: $549 to $2,199.
Key Tip: While established brands may cost more, they often come with stronger warranties and better customer support.
- Additional Features and Accessories
Extra features can enhance your trampoline experience but come with added costs.
- Safety Nets: $50 to $200.
- Ladders: $20 to $100.
- Other Add-Ons: LED lights, weather covers, and basketball hoops can increase the total price.
Consideration: While optional, these accessories improve usability and enjoyment, making them worth the extra expense for many buyers.
- Installation Type: Above-Ground vs. In-Ground
The type of installation can also affect the cost.
Above-Ground Trampolines
- Typically less expensive and easier to install.
In-Ground Trampolines
- Provide a sleek, aesthetic look but involve higher costs due to installation:
- Excavation: $400 to $1,500.
- Retaining Walls: Around $2,000.
- Drainage Systems: $500 to $1,500.
- Total Cost: $1,500 to $5,000.
Key Insight: In-ground trampolines are a great option for families prioritizing aesthetics and safety but come with a higher price tag.
- Considerations Beyond Price
When buying a trampoline, consider more than just the upfront cost.
- Safety Features: Enclosures, padding, and weight limits are crucial.
- Durability: Weather-resistant materials and sturdy frames reduce maintenance needs.
- Ease of Assembly: Look for trampolines with clear instructions and minimal parts.
- Customer Support: Warranties and reliable service ensure a hassle-free experience.
- Accessories Included: Ladders, safety nets, or covers can add value to your purchase.
Pro Tip: Spending a little extra on a high-quality trampoline often pays off in terms of safety, durability, and long-term enjoyment.
- Finding the Sweet Spot: Balancing Budget and Quality
For a good-quality trampoline from a reputable brand, you can expect to spend between $600 and $1200 for an 8 to 14-foot model. While cheaper trampolines are available, they may lack safety and durability.
Key Advice:
- Avoid overly cheap trampolines that might compromise on safety features.
- Choose a trampoline that fits your budget without sacrificing essential features like enclosures and sturdy frames.
Conclusion
Buying a trampoline is an investment in fun, fitness, and family time. By understanding the factors that influence costs—like size, quality, brand, and features—you can make a well-informed decision that suits your needs and budget.
Whether you’re looking for a budget-friendly option or a premium model, prioritizing safety and durability will ensure years of enjoyment. Take the time to compare models, and remember that a little extra investment upfront can save you time and money in the long run.